Remove the green in three steps
Choose an editor: CapCut for a simple clip, DaVinci Resolve for matte and spill cleanup, or Premiere Pro for an Adobe workflow. Use these editors directly; this page is a guide, not a video uploader.
- Import: put the green-screen video above the replacement background.
- Key: apply Chroma Key, sample the screen beside your subject, then adjust tolerance, edge softness, and spill.
- Export: save the composite, or use an alpha-capable format for transparency. Ordinary H.264 MP4 will not keep alpha.
No green screen, or the key loses your subject? Try AI cutout or manual masking. For shadows and green fringes, use the cleanup steps below.
The short answer: four settings decide the result — key colour, tolerance (similarity), edge softening, and spill suppression. Set them in that order, and only touch tolerance once your key colour is sampled from a properly lit part of the screen. If the export still looks wrong after that, the problem is almost never the keying: it is the format. The base H.264 stream has no alpha channel, and a base HEVC stream does not carry one either — transparency in HEVC comes from an auxiliary alpha layer, which Apple standardised as the HEVC with Alpha profile. An ordinary MP4 preset writes neither, so a "transparent" export comes back with a flat black or grey background.
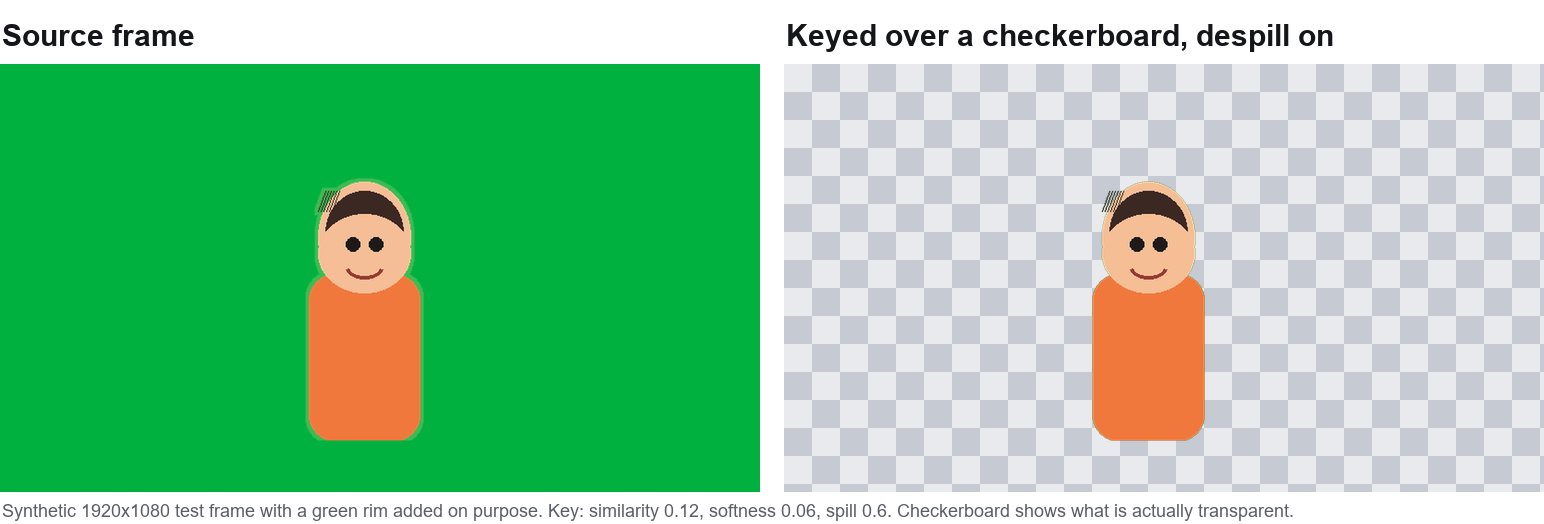
Everything below is about the middle part of that sentence — the settings, in order, with starting values you can adjust, plus what to do when the footage is already shot and you cannot call the talent back.
Why most green screen removals look ragged
There are only four reasons a key fails, and they are not equally common:
- Uneven lighting. The screen is one shade of green in the middle and a darker, bluer green at the edges. A single key colour cannot describe both, so one side of the frame keys badly.
- Spill. Green light bounces onto the subject — most visibly on hair, shoulders and anything shiny. The key itself is fine; the fringe around the subject is not.
- A key colour sampled from the wrong pixel. Picking the darkest corner of the screen or a shadowed fold gives the keyer a colour that does not exist where the subject actually is.
- Chroma subsampling. Footage recorded at 4:2:0 stores colour at a quarter of the resolution of brightness. Fine edges are exactly where that hurts, which is why a key that looks great on a phone screen falls apart on a monitor.
The four settings, in the order you should touch them
1. Key colour — sample the area the subject stands in
Pick a pixel from the screen behind and beside the subject, at mid-height, where the lighting is representative. Not a corner, not a fold, not a highlight. If the screen is lit unevenly, sample two or three spots and split the difference — or key in two passes (see below).
2. Tolerance / similarity — raise it until the background is gone, then back off one notch
Tolerance is how far a pixel's colour may drift from the key colour and still be treated as background. Push it up until the screen disappears, then drop it slightly so the subject stops losing chunks — green clothing, green props, and dark hair edges are the first casualties. On most keyers the useful band is narrow: a few percent either way changes the result more than you expect. If you need a very high tolerance to clear the background, that is a lighting problem, not a settings problem.
3. Edge softening / feather — small numbers only
This blurs the boundary so the cutout does not look like it was made with scissors. On 1080p footage, one to three pixels is usually enough. Push it much higher and the subject starts looking like it is wrapped in plastic, and the matte bleeds into the new background. Feather hides a slightly imperfect key; it cannot hide a badly lit screen.
4. Spill suppression — the one people forget
Spill suppression desaturates the green that bounced onto your subject. Turn it on, then raise it slowly while watching hair and light-coloured clothing: too little leaves a green rim, too much turns skin grey and drained. A useful trick is to check the result against a strongly coloured background — a green fringe that is invisible against a dark background is glaring against magenta.
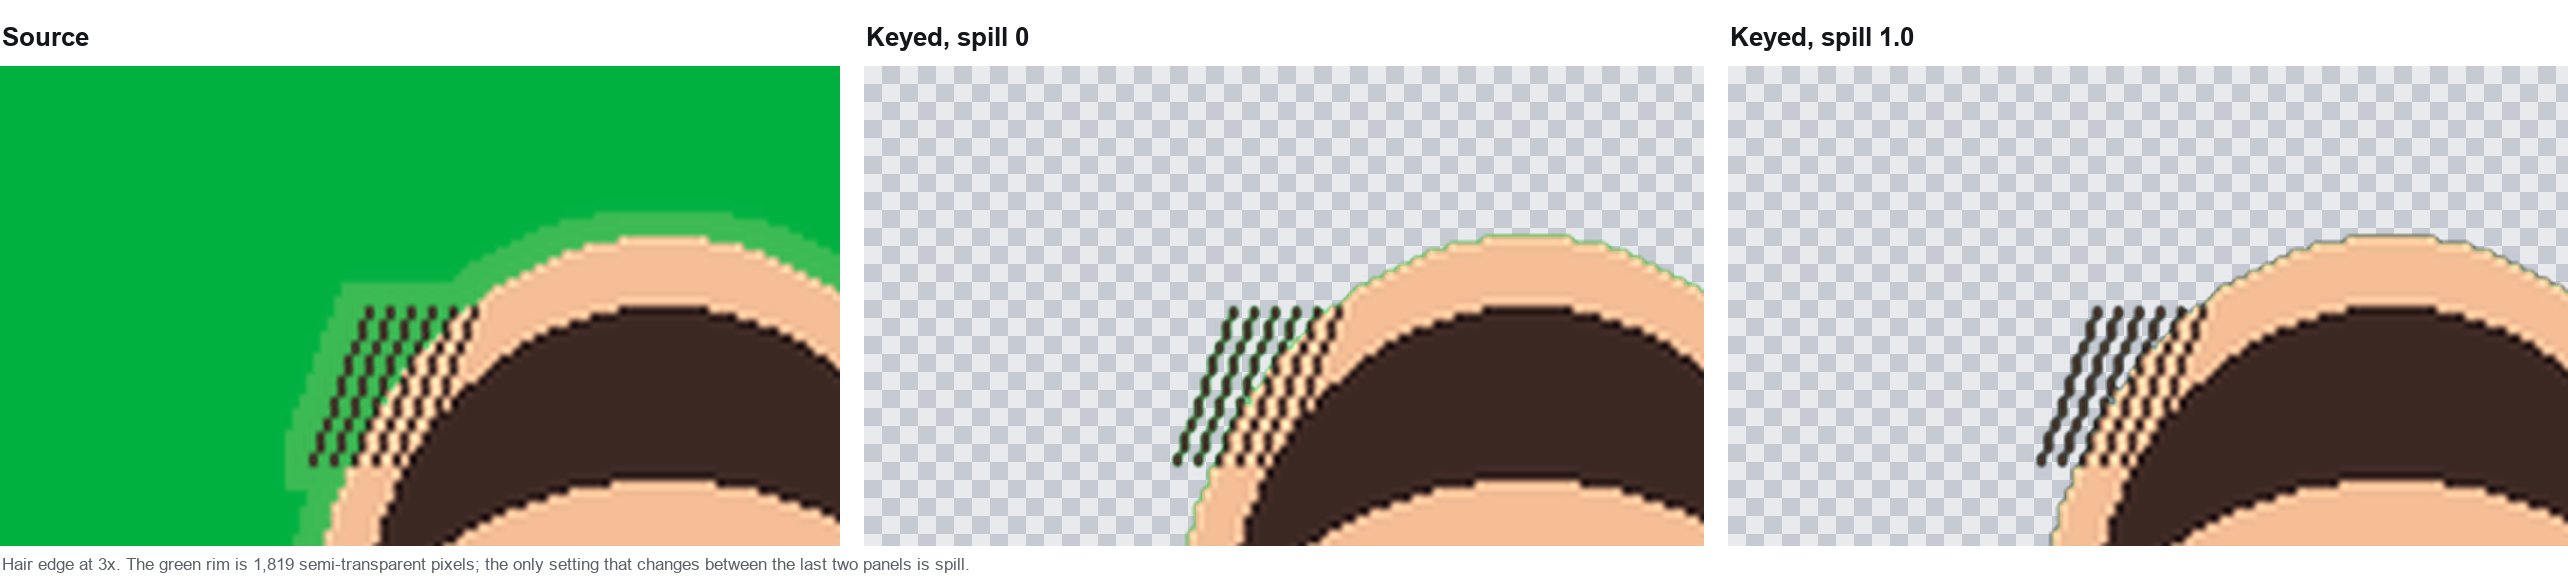
g' = g − (g − max(r, b)) × spill, the formula this site's tool uses, which pulls green down to the level of the other channels and leaves the alpha channel untouched.Editor-specific walkthroughs: the same four settings in four editors
The four settings above — key colour, tolerance, edge softening, spill suppression — appear in every editor that has a chroma key tool, but the controls have different names and live in different panels. The walkthroughs below apply the same settings through four editors, from the simplest to the most feature-complete. Each one ends with the specific failure you are most likely to hit in that editor and what to do when it happens.
CapCut (desktop, free)
Step 1 — Import and place. Drag the green screen clip onto the timeline. If you have a replacement background, drag it onto a track below. CapCut handles the layering automatically: the top track is the foreground, the track below is the background.
Step 2 — Key. Right-click the green screen clip and select Remove Background, then Chroma Key. CapCut opens a panel with a colour picker eyedropper. Click on the green screen beside your subject — not a corner, not a fold. A similarity slider appears. Raise it until the green background disappears in the preview. If the subject starts losing edges, back the slider off by one or two increments. CapCut's edge feather control is the edge softening equivalent: set it to 1–3 for 1080p footage. There is no dedicated spill suppression slider in CapCut's chroma key panel; if you see a green fringe on the subject, add a Hue and Saturation adjustment from the Effects menu, target the green range, and reduce saturation by 15–25 points.
Step 3 — Export. Go to Export, select MP4, and choose H.264. CapCut does not export alpha transparency — if you need a transparent video, use a different editor. The composite (subject over new background) is baked into the export automatically. Check the output by opening the exported file and scrubbing to a frame where the subject moves against the background to confirm no green fringe.
Likely failure and fallback. CapCut's chroma key is basic: it has a single similarity control and no advanced matte refinement. If the green screen is unevenly lit, the key will leave patches of green in the dark areas or eat into the subject in the bright areas. The fix is to duplicate the clip on a second track, key each copy with a different similarity threshold (one tight for the well-lit centre, one loose for the edges), and mask the two halves so each key only covers its zone. If that is too fiddly, switch to DaVinci Resolve, which has a proper Delta Keyer with matte cleanup controls.
DaVinci Resolve (free)
Step 1 — Import and place. On the Edit page, drag the green screen clip onto track V2 and the replacement background onto track V1 below it. The background will be hidden behind the green screen until you key it.
Step 2 — Key. Switch to the Color page. Select the node for the green screen clip. In the OpenFX panel, search for Delta Keyer and drag it onto the node. In the Delta Keyer controls, use the eyedropper to sample the green screen. The key colour is now set. Expand the Matte controls: adjust the low and high softness sliders to control tolerance — raise the high softness until the background clears, then pull it back if the subject edge dissolves. The Edge controls include shrink and feather: set feather to 1–3 pixels for 1080p. For spill, add a Spill Suppression node after the Delta Keyer: in the node tree, right-click and add a Serial Node, then apply the Spill Suppression effect from OpenFX. Raise the suppress value while watching hair and light-coloured clothing — stop when skin tones start looking grey.
Step 3 — Export. Switch to the Deliver page. For a composited video (background baked in), choose QuickTime MP4 H.264. For a transparent video, choose QuickTime and set the codec to ProRes 4444 — this carries alpha. Do not select H.264 if you need transparency; it has no alpha channel. Check the Alpha checkbox in the video tab if it is available. Render to disk and open the file to confirm.
Likely failure and fallback. The Delta Keyer handles even lighting well but struggles when the screen has hot spots and dark corners in the same frame. If one threshold cannot clear the whole screen, split the matte: add a second Delta Keyer node, set it to a different threshold range, and use a Power Window (rectangle or polygon) to limit each keyer to its zone. Draw the Power Window around the evenly lit centre for the first keyer, then invert it and use the second keyer for the edges. Merge the two mattes with an additive blend. If the subject has fine hair that keeps disappearing, lower the high softness and use the Matte Cleanup controls — Pedestal to remove semi-transparent pixels in the background, and Choke to tighten the matte edge.
Adobe Premiere Pro
Step 1 — Import and place. Drag the green screen clip onto a video track (V2 or higher) and the replacement background onto the track below (V1). The background will be hidden until the key removes the green.
Step 2 — Key. Open the Effects panel and search for Ultra Key. Drag it onto the green screen clip. In the Effect Controls panel, use the eyedropper next to Key Colour to sample the green. Set the Setting dropdown to Aggressive first — this gives a strong initial key. If the subject edge is being eaten, switch to Relaxed. Under Matte Cleanup, raise Pedestal to remove grey semi-transparent pixels in the background (start at 10 and increase until the background is fully opaque or fully transparent). Raise Suppress to remove spill on the subject (start at 10 and watch hair and shoulders). The Transparency value under Matte Cleanup is the tolerance equivalent: adjust it if the background has residual green patches. There is no explicit feather control in Ultra Key; the Setting preset handles edge softening implicitly. For manual feather, add a Garbage Matte (4-point or 8-point) from the Effects panel to cut away frame edges where the key is worst.
Step 3 — Export. Go to File, Export, Media. For a composited video, choose H.264 and match the source bitrate. For a transparent video, Premiere Pro's H.264 encoder does not support alpha — choose QuickTime and set the codec to ProRes 4444, or use the PNG sequence option for per-frame transparency. If the Video tab has an Alpha Channel option, set it to Straight or Premultiplied depending on your compositing target. Render and verify.
Likely failure and fallback. Ultra Key's Aggressive preset can eat into semi-transparent areas like sheer fabric or motion-blurred edges. If that happens, switch to Relaxed and use the Garbage Matte to exclude the worst frame edges, then raise the Pedestal and Suppress manually. For spill that survives the Suppress control, add a Lumetri Color effect after the Ultra Key, open the HSL Secondary tab, select the green hue range with the eyedropper, and reduce saturation on that range only. If the key is still unusable on a particular section, replace that section with a short clip of the subject on a neutral background, or switch to After Effects with the Roto Brush tool for frame-by-frame masking.
After Effects
Step 1 — Import and place. Create a new composition from the green screen clip. Import the replacement background and drag it below the green screen layer in the timeline. The background will be hidden until the key is applied.
Step 2 — Key. With the green screen layer selected, go to Effect, Keying, Keylight (1.2). In the Effect Controls panel, use the Screen Colour eyedropper to sample the green. Keylight is more sophisticated than Ultra Key: it separates the matte into inside and outside masks, and gives you independent control over edge softness and spill. Set the View dropdown to Screen Matte to see the matte in black and white — white is the subject, black is the background. Adjust Screen Gain (tolerance equivalent) until the background is black. Adjust Screen Softness (edge softening equivalent) to 1–3 for 1080p. Switch View back to Final Result. Under Screen Matte, lower Clip Black to remove grey pixels in the background and raise Clip White to solidify the subject. For spill, the Despill Bias control shifts the edge colour toward neutral — raise it slowly while watching hair. Screen Shrink/Grow tightens or expands the matte edge: use 1–2 pixels of shrink if there is a persistent green rim.
Step 3 — Export. Go to Composition, Add to Render Queue. For a composited video, choose H.264 in the Output Module. For a transparent video, choose QuickTime with ProRes 4444, or PNG sequence with RGB+Alpha channels. In the Output Module settings, set Channels to RGB+Alpha and Color to Straight (Unmatted) if the next step is another compositor, or Premultiplied if the file goes directly to a video player. Render and verify.
Likely failure and fallback. Keylight produces clean mattes on well-lit screens but can struggle with hair that has fine, semi-transparent strands. If Clip White adjustments eat into the hair, switch View to Intermediate Result and use the Individual Colour Controls to suppress green on the subject only, without affecting the matte. For footage where the screen lighting is so uneven that Keylight cannot produce a clean matte, use the Roto Brush tool instead: select the Roto Brush from the toolbar, paint over the subject, and let After Effects track the mask across frames. Roto Brush does not use a colour key — it segments the subject by motion and shape — so it works on any background, not just green screen. The trade-off is that Roto Brush requires frame-by-frame review and is slower to render than a colour key.
Fixing footage you cannot reshoot
When the screen was lit unevenly or the subject moved close to it, one pass will not do it. Three techniques cover most of these cases:
- Key twice with a mask. Split the frame into the area that keys well and the area that does not, then apply a separate key to each. Two mediocre keys beat one compromise key.
- Use a garbage matte first. Draw a rough shape around the subject and exclude everything outside it. The keyer then only has to solve the difficult edges instead of the whole frame.
- Desaturate the greens in a second pass. If spill survives suppression, a targeted hue/saturation reduction on the green range cleans up the fringe without touching skin tones.
Export: getting the transparency out alive
This is where good keys go to die. Transparency needs two things that are easy to confuse: a format that can store alpha, and a player that composites it. Failing either one gives you a flat background.
- No alpha at all — H.264 (AVC). This is the default in nearly every editor's export panel, which is why "transparent in the preview, black in the file" is such a common surprise.
- Alpha, Apple platforms — HEVC with Alpha. Apple published the profile in 2019: the alpha travels as a second, auxiliary HEVC layer beside the colour layer, each with its own parameter sets. Apple's documentation puts the sample code at macOS 10.15 or later, and the WWDC session that introduced it names iOS 13, tvOS 13 and macOS Catalina as the playback baseline. A decoder that ignores the auxiliary layer still plays the colour layer, so the file plays flat rather than failing.
- Alpha, Chromium and Firefox — WebM with VP8 or VP9. These are the two engines where alpha WebM is the well-trodden path, and the combination we would reach for first on Windows or Android. Version matters more than brand here, so verify with your own file rather than trusting a support table.
- Playing a file is not the same as compositing its alpha. Safari is the case where those two come apart most often, and it is also the browser most likely to change between versions. Test the exact browser and version you are shipping to, with a file whose alpha you have verified elsewhere, before you rely on WebM alone — and ship HEVC with Alpha as a second source if the page has to work in Safari.
- Production formats. ProRes 4444, QuickTime Animation, and PNG or TIFF image sequences all carry alpha and are the right choice when the file is going into another editor.
- Re-encoding flattens it anyway. Social platforms and video hosts re-encode uploads and transparency rarely survives. If the clip is going to be uploaded, composite the new background in the edit and export a normal opaque file.
A practical rule: pick the alpha format your delivery target actually composites. WebM with VP9 for Chromium and Firefox, HEVC with Alpha for Safari and Apple devices, ProRes 4444 or an image sequence when the next step is another editor. And when the next step is a viewer rather than an editor, bake the background in and skip the problem entirely.
Verifying the exported file
The preview in your editor is not proof that the export is correct. The preview composites alpha in real time using the editor's own renderer; the exported file has to survive a separate encode and then be played back by a different decoder. Four checks confirm the file is actually usable:
- Check the file size. A ProRes 4444 file with alpha is roughly twice the size of the same clip exported as ProRes without alpha, because the alpha layer is a full-resolution greyscale channel. If the file size is close to what a normal opaque export would produce, the alpha channel was probably dropped during encoding. A WebM VP9 with alpha is slightly larger than one without, though the difference is smaller because VP9 compresses alpha efficiently.
- Open the file in a different player than your editor. If you exported from DaVinci Resolve, open the file in VLC media player or in a web browser. VLC shows transparency as a checkerboard pattern by default; a web browser shows it only if the file is loaded into a
<video>element with CSS that places something behind it. If the player shows a solid black or grey background, the transparency is gone — either the format does not carry alpha, or the player does not composite it. - Test in the actual delivery target. If the file is going on a web page, embed it in an HTML
<video>element and place a coloured background behind it using CSS. If the coloured background shows through the transparent areas, the alpha is working. If you see black, the browser either does not support the codec's alpha (common with HEVC on non-Apple browsers) or the file was encoded without it. For a file going into another editor, import it and check whether the editor recognises the alpha channel — most editors show a checkerboard or an alpha view toggle. - Scrub to the hardest frame. Move the playhead to a frame where the subject has motion blur, fine hair, or a semi-transparent edge. These are the frames where matte problems hide. If the edge looks clean there, it will look clean everywhere — edges that only fail on static frames are rare, but edges that only fail on motion frames are common.
If any of these checks fail, the problem is almost always in the export settings, not the key itself. Re-check the codec selection (H.264 cannot carry alpha, no matter what the preview showed), confirm that the Channels setting in the export dialog includes Alpha, and re-render. Do not try to fix a missing alpha channel by adjusting the key — the matte was correct in the editor, and the export dropped it.
Shooting it right the next time
- Light the screen separately from the subject, and check it with a scope or waveform if you have one — the goal is an even value across the whole surface.
- Keep the subject at least one and a half metres from the screen. Distance is what stops green bouncing onto them in the first place.
- Do not overexpose the screen. A blown-out green clips to white-ish values and loses the colour information the keyer needs.
- Shoot the highest chroma quality your camera offers. 4:2:2 halves the problem described above compared with 4:2:0.
- Avoid green clothing, green props, and green reflections in glasses — every one of them is a hole in your matte waiting to happen.
When you only need a clean still or a quick clip
If the job is a single frame, a thumbnail, or a short clip and you do not want to open an editor at all, a browser-based keyer is usually faster. Our own green screen remover runs entirely on your device — it takes an image, not a clip, and processes it in the browser without uploading it, which matters if the footage is client work or contains people who did not sign up for it to sit on someone else's disk. For a clip, export the frame you want to fix as a still and run that through; the rest of the settings on this page still apply. You can confirm the no-upload claim yourself: open your browser's developer tools, switch to the network panel, and watch that no request carries your file.
For anything longer than a few seconds, or where you need masks and multiple key passes, stay in an editor — that is what those tools are for.
Using a green screen remover on video frames
If you do not have a full editor and need to process a clip that was shot on green, you can break it into frames and run each one through an image-based remover. This is slower than keying in an editor — the editor applies settings once and tracks them across frames, while an image tool processes each frame independently — but it works for short clips and gives you a transparent PNG per frame that you can reassemble or composite.
The workflow: export your clip as an image sequence (PNG, not JPG — JPG has no alpha channel), run each frame through a green screen remover that outputs transparent PNG, then reassemble the frames in a video editor or with FFmpeg. The settings on this page — key colour, tolerance, edge softening, spill suppression — apply identically to each still frame. The trade-off is consistency: because each frame is keyed independently, the edges may flicker slightly from frame to frame. An editor's temporal smoothing solves this; an image-by-image workflow does not.
For clips longer than a few seconds, the frame-by-frame approach becomes impractical. A 30-second clip at 30 fps is 900 frames to process, download, and reassemble. If you are doing this regularly, an editor with a proper keyer is the right tool. The video editing software guide covers editors that include chroma key tools, and the video background remover guide covers the case where you do not have a green screen at all.
Quick answers
Why is there still a green edge around my subject?
That is spill, not a keying failure. Raise spill suppression and, if it persists, reduce saturation on the green hue range in a second pass. The cause is almost always a subject standing too close to a brightly lit screen.
Why does my subject lose chunks — a piece of hair, a shoulder?
Your tolerance is too high, or the subject contains colours close to the key colour. Lower the tolerance and use a garbage matte so the keyer only has to solve the edges.
Can I key a blue screen instead of green?
Yes, and sometimes you should — blue is the better choice with green clothing, green props, or green eyes. The settings work the same way; only the key colour changes.
My export is transparent in the preview but black in the file. What happened?
Two different failures look identical here. Either the codec cannot store alpha, or the player does not composite it. A base H.264 stream has no alpha channel, so a standard H.264 export is always flat. HEVC carries alpha as an auxiliary layer defined in the standard's multi-layer extensions, and Apple's HEVC with Alpha profile is the one with documented playback support on Apple platforms. For transparency in a browser on Windows or Android, export WebM with VP8 or VP9 and test the player you actually target. If the clip is going to a viewer rather than an editor, composite the background and export a normal opaque file.
Does a badly lit screen ruin the shot?
It makes the key harder, not impossible. Two keys with a mask, plus a garbage matte, will rescue most unevenly lit footage. It just takes longer than it would have taken to relight the screen.
Can I use a green screen remover on a video clip?
Yes, by exporting the clip as a PNG image sequence and running each frame through an image-based remover. This works for short clips but is impractical beyond a few seconds — a 30-second clip at 30 fps is 900 frames. Each frame is keyed independently, so edges may flicker slightly between frames. For anything longer, use a video editor with a proper chroma key tool.
What is the difference between a green screen remover and a video background remover?
A green screen remover keys a specific colour — usually green — out of footage that was shot against a green screen. A video background remover removes any background, with or without a green screen, using AI segmentation or manual masking. Green screen removal is faster and produces cleaner edges when the screen is lit correctly; background removal is more flexible but slower and less precise on fine details.
Related reading: removing a video background without a green screen (AI and manual methods), how to light a green screen, replacing a green screen with an image, and blue screen versus green screen. If you are keying inside CapCut rather than a full editor, the CapCut green screen steps walk the same four settings through that interface, and rescuing an unevenly lit screen covers the footage this page tells you to reshoot.